
Microsoft Windows is a closed-source operating system that can access, alter, and copy by the original makers. The entire software that runs in closed source software (CSS) is used with closely guarded code and is protected by a registered trade name. The software is not fully purchased to run on windows but only paid by the user for limited time usage. It is the reason the user cannot easily fix the problem of high CPU & high data usage caused by Windows Modules Installer Worker.
So whenever windows start updates & repair it, the bugs/error is also entering into the system. When this bugs/error increases the percentage of high CPU usage, this problem is known as Windows Modules Installer Worker. This problem can only be fixing by windows supported configure settings. So in this article, we will provide you the perfect way to fix the issue and run your Windows system smoothly and fast.
How Windows Modules Installer Worker becomes a problem?
Windows Modules Installer Worker (WMIW) or TiWorker.exe is one of the important tools for Microsoft Windows. This command tool runs at the background in Windows 8/10 automatically whenever the system is connected with the internet. Due to the unexpected running, this tool sometime usage high disk processes more than 50%, which makes the computer system slow. Window Modules Installer is seen in the Task Manager of your Windows system. Even your system configuration is high with a powerful processor with more than 8GB of RAM; this problem occurs and can only stop/fix with some specific guidance. Sometimes due to the auto windows update downloading & installing process, the system gets slow, for that you need to wait until the process completes.
SUGGESTION: It is better that you turn off your Windows system update and change it to manual option whenever you are free or require any updates of your Windows PC.
How To Fix Windows Module Installer Worker By Changing Automatic Update to Manual
If you think that this method can be applied only on Windows 10, then update your knowledge that you can change the automatic update setting to manual in Windows 8 & 7. We apply this method in Windows 10 version to check that it works or not. If you are using another Windows version and get troubleshoot, then contact us using the comment box.
Step #1. Open the Services setting for that open Run program by pressing Windows +R key from keyboard and type “services.msc” to the given bar and press enter or click on the “OK” button.

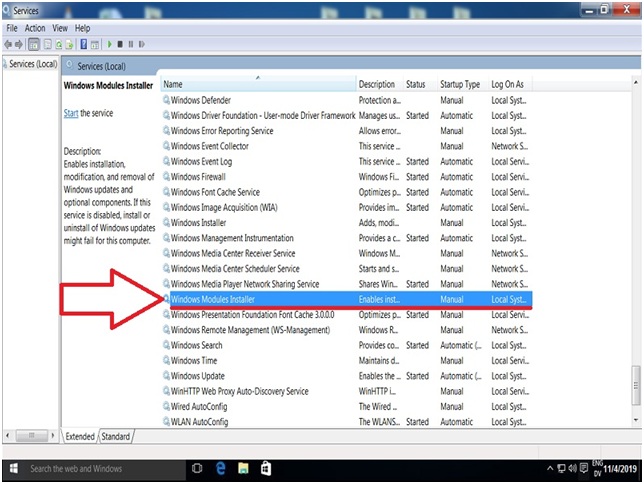
Step #2. Services (Local) window will pop-up on the screen where you need to search “Windows Module Installer” from the list, as you can see in the screenshot.
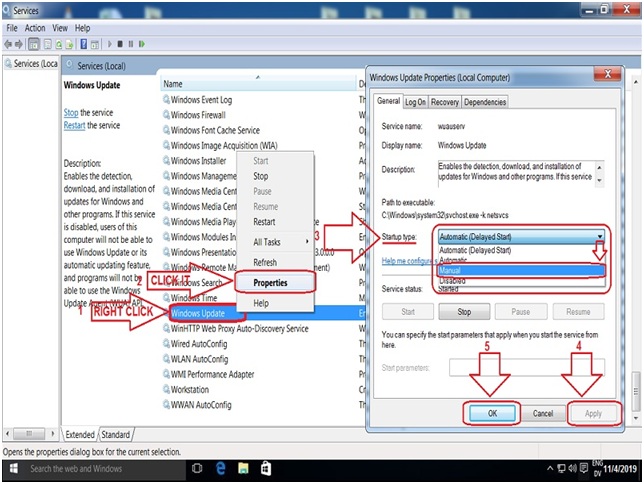
Step #3. Using the right mouse, click on the Windows module installer then click on the “Properties” option. Windows Module Installer Properties (Local Computer) pop-up on the screen, there you need to change the Startup type from Automatic to Manual and then click on the “Apply” button for conformation, then final “OK” button which will update your changes and close this window.

Step #4. Here you need to change the setting “Startup type” from automatic to manual for that goes to services.msc windows and search for “Windows Update.” Once found, select it and right-click on it next select properties from the option — the Windows Update Properties (Local Computer) windows will pop-up. Now go click on the “Startup type” setting and change it from automatic to manual. Once it has done, click on the “Apply” button for confirmation then “OK” button to update the change setting.
Step #5. Open the “Windows Update” window from the Control Panel where you adjust your computer’s settings by click on Change settings and change “Important updates” to “Check for updates but let me choose whether to download and install them.” At last, click on the “OK” button to confirm the setting and close every open window to restart your PC. Once your PC restarts, you will see the system runs smoothly without any extra usage of CPU and disk at a high percentage.
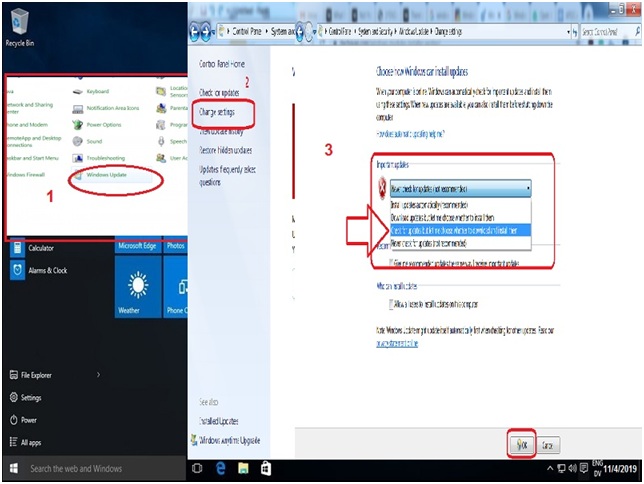
For Windows 7 Users: Control Panel > System and Security > Windows Update > Change settings >
Final Words:
Now you have finally learned how to get a “manual” update activated on your Windows 10 PC, which runs automatic windows update whenever your PC is connected with the internet. Because of this problem, high CPU and disk usage processes where the system gets slow or freeze. The important thing is that you follow the steps carefully, as mention in the above guidance, and fix Windows Modules Installer Worker. If you want to share your experience or got troubleshoot during the process, then contact us using the comment box.

Reply