In November 2006, Microsoft Windows has updated its components that still work as future technology. Some of these components can also be noticed in Windows 10 current version of Microsoft Windows Computer. Every component has different processes function in order to maintain the Windows system running from the background. RAVBg64.EXE is one of them that run Realtek High Definition Audio Driver at the background of running a Windows system. This executable file can also be noticed during the permission of operating such communication apps like Skype.
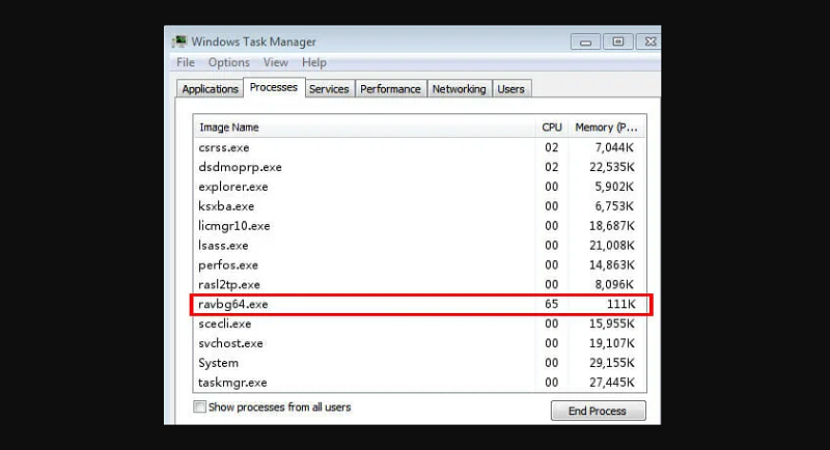
RAVBg64.EXE is also called as Realtek Audio-Video Background process (64 Bit). The visibility of this process can be found in Device Manager or even in Task Manager when there are high CPU usage risk factor increases. If you are also facing such an issue, then you need to follow the method given in this article instead of removing it from your system by considering it as a virus threat.
How RAVBg64.EXE Works?
This HD audio background process is pressuring on High CPU usage up till 100%, which is not a good sign when it comes to the latest Windows 10 with advanced hardware. This type of situation makes people nervous, and they think that some hijackers attacked their system, which results sometimes removed or delete form the Microsoft Windows system. You need to know that ravbg64.exe is not a virus or other malware threats. So whenever ravbg64.exe using high CPU/RAM usage, then you can disable it through Device Manager EXPAND sound, video, and game controllers RIGHT-CLICK high definition audio device SELECT disable.
Are there other Microsoft Windows System processes components like RAVBg64.EXE?
Yes, the Microsoft windows system is full of processes components that run at the background of running windows PC. Such Microsoft Windows system process is Service Host Superfetch this component helps the apps to processes with fast load, Rundll32 exe this system process run those programs that held in DLL (Dynamic Link Library) files, Windows Modules Installer Worker or TiWorker.exe is a Windows update service which helps the system to get the latest update and install it automatically into the system.
How To Reduce RAVBg64.EXE High CPU/RAM Usage By Create Registry New Key (Regedit)
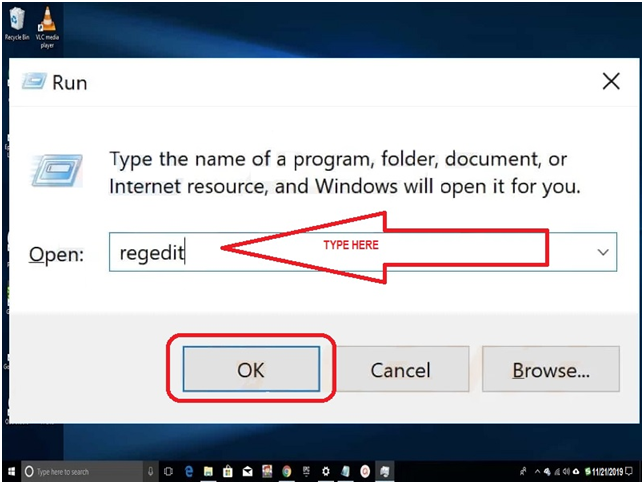
Step #1. First, open the “Run” program and type “Regedit” to the provided field then click on the “OK” button.
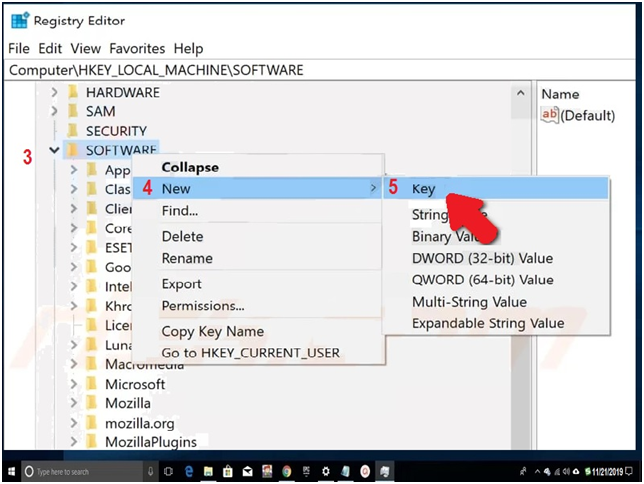
Step #2. The Registry Editor window will appear on the screen; here, you need to expend the following path “Computer\HKEY_LOCAL_MACHINES\SOFTWARE.” Using mouse control right, click on the “Software” option will appear there expend “New,” then click “Key.” You need to name that new key, “SRS Labs.”
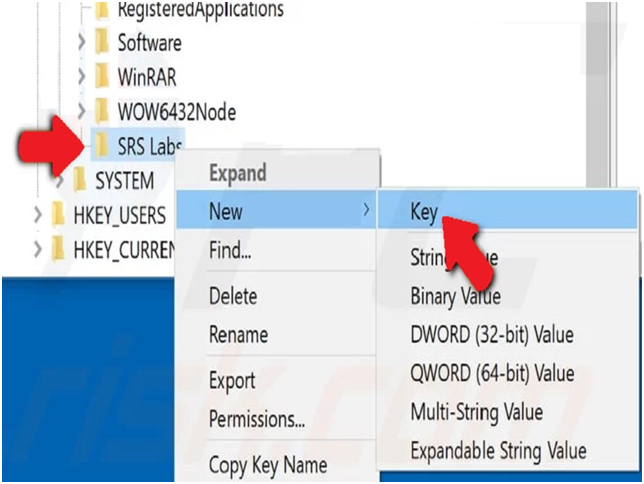
Step #3. Now Right-click on new key SRS Labs option appears to expend “New” then click “Key” same as you did in above step #2. Name the new key “APO,” which also adds into the expend list.
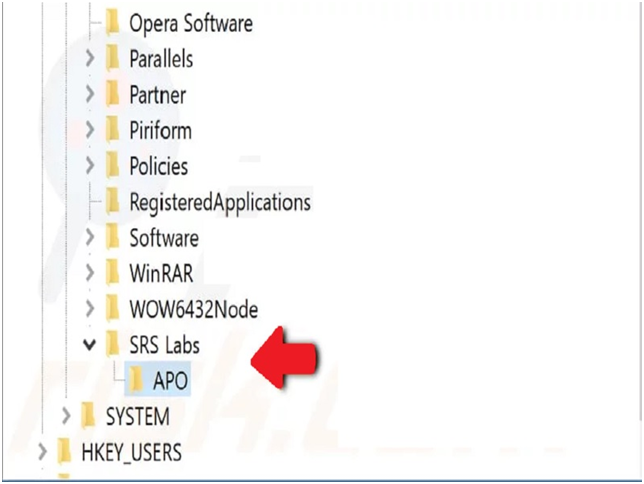
Step #4. You can see in the screenshot hot the expend table will look. Now close the Registry Editor window and restart your PC. It will update all the changes which you made and also check RAVBg64.exe is no more causing HIGH CPU usage. Applying this method has made it normal, and your system is back in speed again.
If you think that this method is not easy for you to understand and apply or the problem still present (occurring), and then go with the next method.
How To Reduce RAVBg64.EXE High CPU/RAM Usage By File Checker System
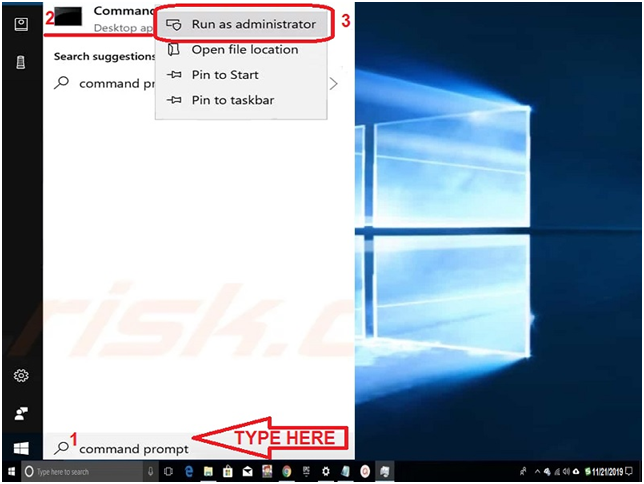
Step #1. Very first, you need to run “Command Prompt administrator,” for that you need to type “Command Prompt” in a search bar where you get the Command Prompt desktop app. Right-click on it and click “Run as administrator.”
Step #2. Once you’re Select Administrator: Command Prompt appears to type in command line “sfc /scannow” and press the “Enter” key.
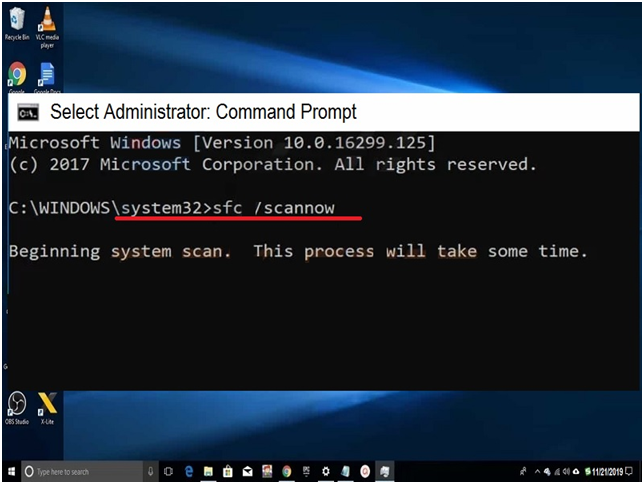
Step #3. You will be notified that this process will take some time while beginning a system scan. So once it has done you will see that the Ravbg64.exe process is slow down, and there is no high CPU usage issue remains in your window PC.
Final Words:
RAVBg64.EXE (Realtek HD Audio background process) is one of the important processes components in the Windows system that should not be deleted because its function is to give the HD audio output. If you apply the above methods and you get the problem solved, and then share your experience in the comment box. It will help other viewers to get the idea that these methods are working.
![How to download songs from SoundCloud [Easy Steps]](https://www.geniusgeeky.com/wp-content/uploads/2018/08/How-to-download-songs-from-SoundCloud-4-160x100.png)

Reply