
As a Windows user, people are not aware of some Microsoft windows commands, until there is an issue or problem raised. In this situation, Service Host Superfetch is a problem faced by millions of Windows users, which increases high disk usage and slows down the PC. You must know that Superfetch is a windows service that cannot be deleted. You can disable it or stop it by different methods which we will discuss here!
The main work of Service Host Superfetch is that it is meant to launches an entire application on Windows OS with improving performance and faster responded speed to the Microsoft Windows system. The function of Superfetch is to uses RAM frequently while pre-loading programs; there is no need for hard drive support to pre-loads any apps. If your windows are getting slow by high usage of service host Superfetch, then you can disable it with a specific method that does not disturb the operating system of your WINDOWS. It is very common in Windows 8, which now shown in Windows 10 operating system.
How To Fix High Disk Usage Cause By Service Host Superfetch On Windows 7, 8 & 10
Method #1: CHECK THE SYSTEM FILE
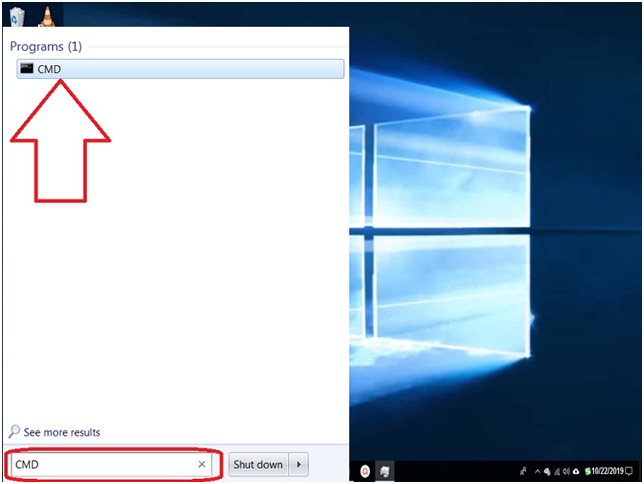
Step #1. This method, you will check the system file that is running for that you need to open the “Start” menu and in search program and file bar type “CMD.”
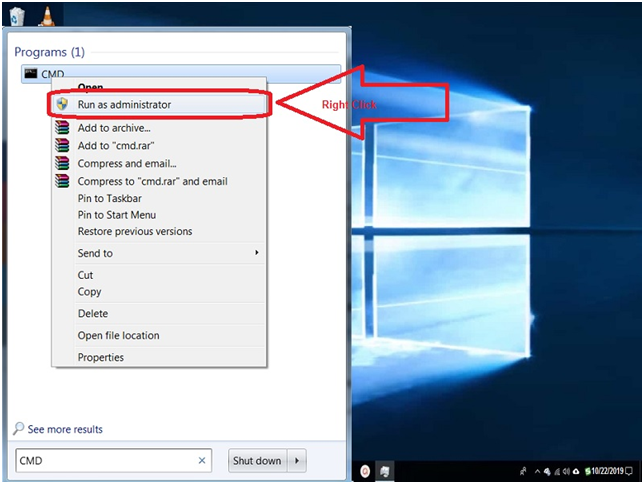
Step #2. Now using the right mouse, click on CMD and click on “Run as Administrator.” Windows Command Processor will pop-up on screen doesn’t worry, click on the “Accept” button.
Step #3. You will directly you get the command prompt, where you type “sfc /scannow” and press “enter”.
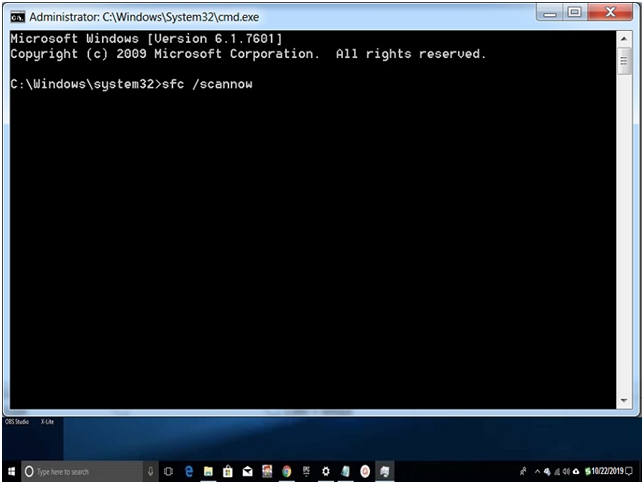
Step #4. At this step window, smart works start where it scan and fix, and a problem occurs on Windows OS. Once the work is successfully done, you get the indication on the command screen “Windows Resource Protection found corrupt files and successfully repaired them.”
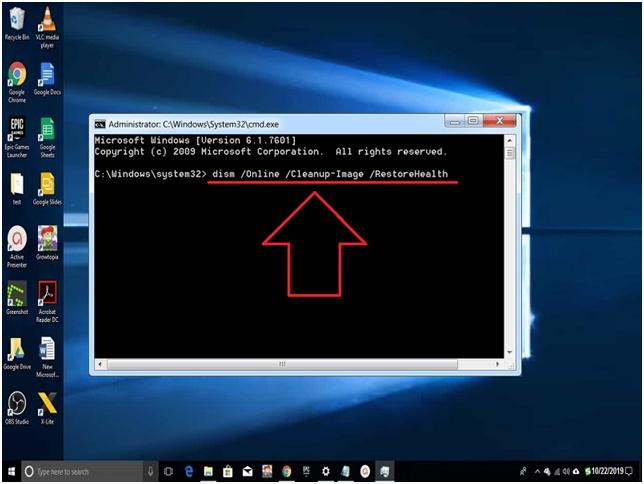
Step #5. Now type the command “dism /Online /Cleanup-Image /RestoreHealth” and press enter. It will run the Memory load, CPU, and confirm any problem left or not. If no issue found, then this method works perfectly on your Windows PC.
Method #2: Remove Service Host Superfetch from Task Manager
Step #1. In this method, you will be removing the service host process located in Task Manager, for that you need to press “Ctrl + Shift +Del” using a keyboard and open Task Manager of Windows. (OPTION TO LAUNCH TASK MANAGER: You can also use the mouse and right-click on the taskbar; there you get the “Start Task Manager” click on it to open)
Step #2. In the task manager, if you click “More details,” it will show you the entire running process on your Windows, search for “Service Host: Local System or service host superfetch,” and “End Task” button appears by select on it.
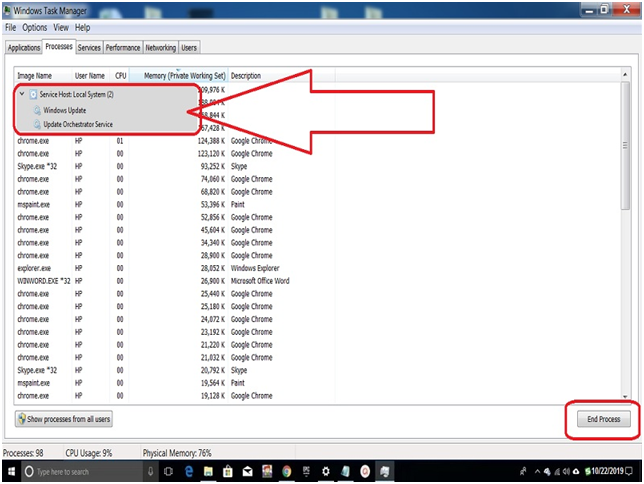
Step #3. Once confirmation shows up, tick on “Abandon unsaved data and shut down” and then click the “Shut down” button.
Step #4. Turn on the windows and check that the problem is solving in CPU load. If no issue found, then this method works perfectly on your Windows version.
In this way, you can solve the high disk usage issue caused by Service Host Superfetch.
Method #3: Disable System Configuration Service
Step #1. In this method, you will learn how to perform a clean boot because the third-party service or apps are causing High disk usage. To apply the technique, start with Windows + R key press from the keyboard, it will open the RUN program.
Step #2. In run provided bar type “MSConfig” and then click on the “OK” button.
Step #3. Your windows system configuration setting will open, tab to “Services” and un-tick entire secret service by removing the tick on “Hide all Microsoft services.”
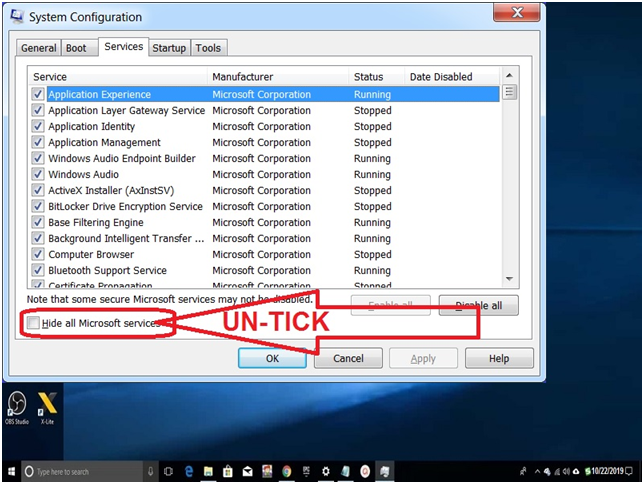
Step #4. Now you need to disable all service by click on the “Disable All” button and then click on the “OK” button.
Step #5. Now you need to go to Task Manager for that tab to Startup and click on “Open Task Manager.”
Step #6. In Task Manager Setting tab to Startup and identify those entire apps which are enabled and select the “Disable” button. This process will repeat to disable complete allow apps.
Step #7. At last, restart your PC and check any problem still shown; if everything works perfectly, then this method works because you apply the steps correctly.
Final Words:
We provided a simple and easy method to fix service host superfetch high disk usage. If you get the solution of high disk usage above method or not then send your experience with detail in the comment box. We hope that you will speed up your windows performance without any problem. You can also share this reducing High disk usage information with your family and friends.

Reply