
Ask any PC gamer and they will tell you the importance of a graphics card. GPU or graphics card is the most important component of gaming. If you have a high-end GPU, you can boost your gaming performance to a great extent. However, gamers or not, many of you don’t know how to overclock GPU or you are simply afraid of messing up your computer.
Overclocking GPU is actually a safe process only if you know the right steps. Most of the graphics cards these days are designed to prevent users from causing any serious damage. If you want to boost your gaming performance by overclocking your GPU but have no idea, we have got your back. In this article, we have provided a detailed guide to overclock your GPU. Without wasting any time, let’s dive into the details.
Steps To Overclock Your GPU
If you are doing it for the first time, you may find it a bit difficult in the beginning. But for your help, we have explained each of the steps vividly so that you don’t face any problem. Now all you need to do is follow the steps closely.
-
Research your graphics card
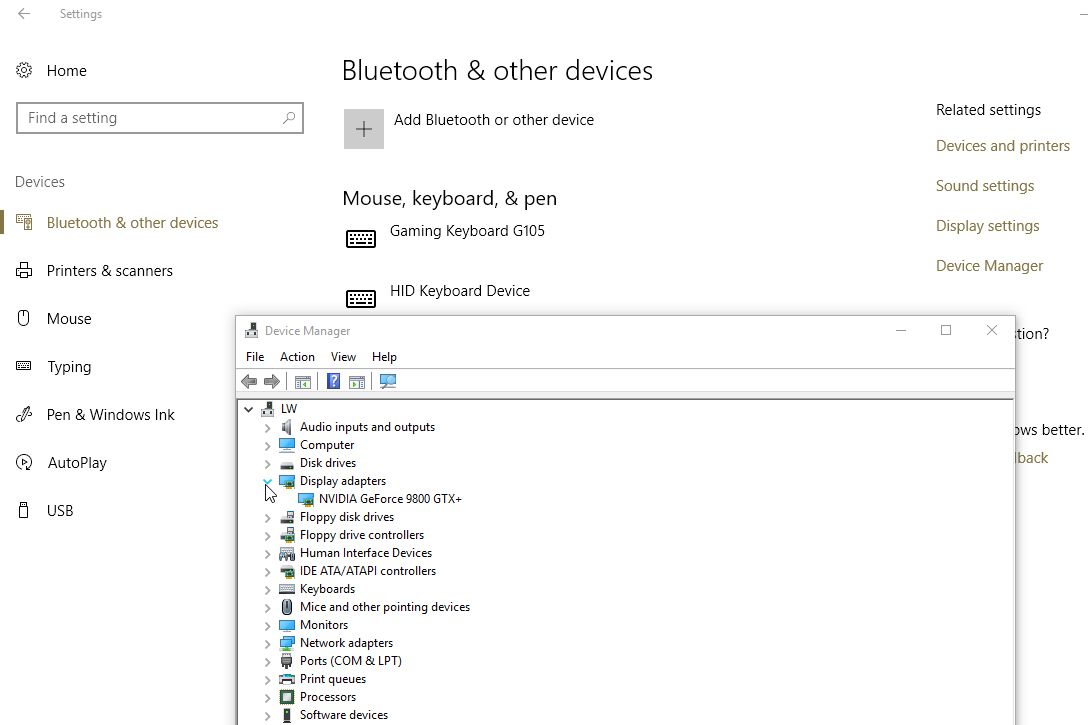
At first, you need to do a thorough research of your graphics card. In other words, you need to first find out the specifications of your system.
- Go to the start menu
- Open the Windows settings menu by clicking on settings
- Select devices
- Select device manager in order to open the device manager window
- Click on > located next to display adapters
Now visit Overclock.net and type in the details of your graphics card. Don’t forget to type in the word ‘overclock’ into the search engine of the website. Now go through the posts in order to know how other users have overclocked their graphics card. Information that you need to take note off include:
- Maximum core clocks
- Safe maximum voltage
- Safe maximum temperature
- Maximum memory clocks
Knowing these details will give you a rough idea about what to do with your graphics card.
- Update drivers and get the overclocking software

In the next step, you need to update your drivers. This is important for pumping up your hardware’s performance.
- Nvidia users can download Nvidia GeForce video card drivers
- AMD users can download AMD/ATI Radeon video card drivers
Once you are done with the drivers, now it’s time to download the overclocking software you need.
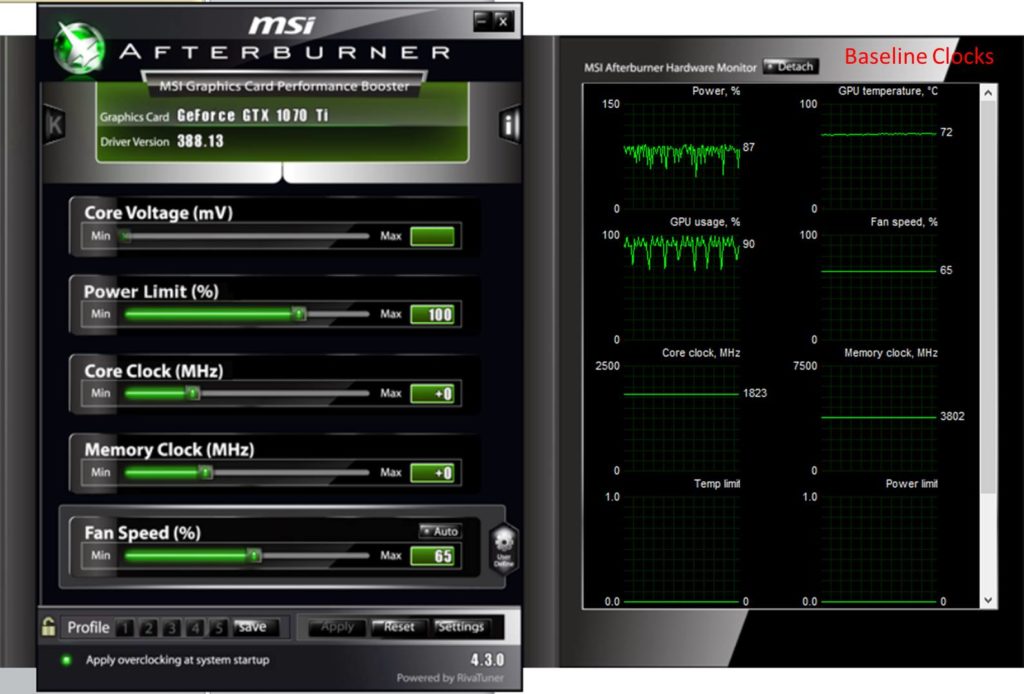
- MSI Afterburner: This is one of the best and widely used overclocking software. You can use this for any graphics card you want.
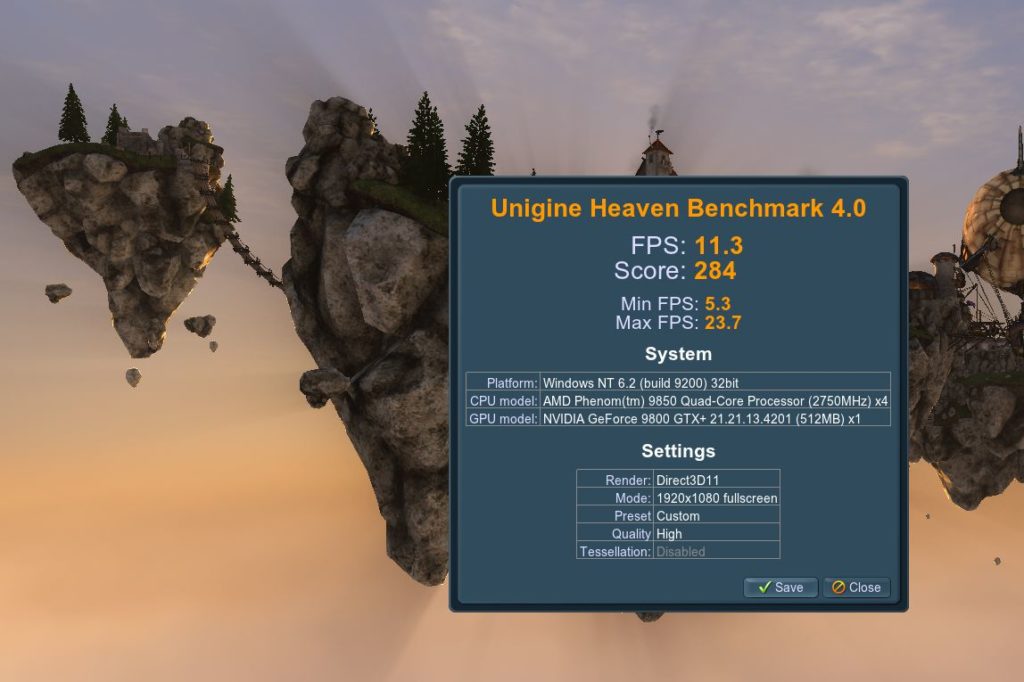
- Unigine Heaven Benchmark 4.0: This software is needed in order to benchmark and test the stability.
- Create a baseline
Open MSI Afterburner. In case, you want to work with a simple interface, go to settings and open MSI Afterburner properties. Now click on the arrow shown on the right and go to the user interface. From the drop-down menu, select the default skin designs.
You need to take a note of the memory and core clock speeds as shown by MSI Afterburner. You can save the details as Profile 1.
Now open Unigine Heaven Benchmark 4.0 and select run. Once you get to see 3D rendered graphics, select Benchmark and allow the software to shift through 26 scenes.
You can either write down or save the benchmark results shown by the software. This is important as you will need it later.
- Increase clock speeds and benchmark
Now that you have established a baseline, it’s time to see how far you can push the GPU.
With the help of MSI Afterburner, raise the core clock by 10 Mhz after which you need to click apply.
Use the Unigine software in order to benchmark the results.
In case, you don’t get to see any artifacts, you can assume that the overclock settings are fine and stable. Open MSI Afterburner’s monitoring window and check the maximum GPU temperature.
If you see that the maximum GPU temperature is below or at the safe maximum temperature which is 90 degrees, you need to save the details as Profile 2.
You need to repeat these five steps all over again. However, in case, you have achieved the maximum clock speed, you can move on to the next section. You should take a pause in order to compare the configuration details that you wrote down previously while researching your graphics card. As you get closer to the previously recorded values, you need to be careful about the temperature and artifacts.
- Know when to stop
In case, you get to see artifacts, it is clear that the current overclocking speed is not stable. If you go beyond the sage maximum temperature, it may overheat your graphics card. Therefore, you should know when to stop.
What you need to do is load the previous stable configuration in MSI Afterburner. Before you benchmark again, make sure that you clear the monitoring window history.
However, if you continue to see artifacts or the maximum GPU temperature above the safe limits, you should reduce the core clock by 5 MHz and then click apply. Before you benchmark make sure that you don’t forget to clear the window monitoring history.
You need to continue repeating the steps until you don’t see any artifacts and also the maximum GPU temperature is within the safe limits. When everything seems stable enough, you can stop as you have successfully overclocked the core clock of your video graphics card.
Now that you are done with the core clock, you need to repeat the same with raising speeds. The only difference is that this time you will have to configure the memory clock of your GPU. Once you are done overclocking both the core and memory clock, you can save the configurations as Profile 3 in your MSI Afterburner.
- Stress test
After you are done with all the above-mentioned steps, it’s time to put the current settings to stress test. In order to do this, you need to click run on the Unigine software. Allow the software to run for hours. While the program is running, you need to make sure that there are no artefacts and also the temperature is within the safe zone. You should know that during a stress test, your whole computer may crash but that is pretty much normal. In case, this happens you should do the following:
- Reduce both the memory and clock by 5 MHz and then hit the apply button in MSI Afterburner.
- You need to continue stress testing your GPU until there is no problem or crashes.
If your GPU can go on for hours during the stress test then you should be happy to know that you are successful in your attempt. However, you shouldn’t forget to save the benchmark results in the Unigine software. You can compare your benchmark results in order to see the improvement.
Overclocking your GPU is a lengthy process but the end results are totally worth your time. If you want to enjoy a better gaming experience and boost the performance of your device, you should definitely try your hands in overclocking. But make sure that you are confident about completing the procedure.

Reply