Since the release of Windows 10 in 2015, many users started facing the problem with the Superfetch. As we know that Windows 10 runs smooth, but the problem with Superfetch still faced by a lot of people which is the Superfetch service occurring because of disk usage stays at 100% in the task manager. So, it’s not a big deal if you are getting the issue with Superfetch as you simply fix Superfetch error with the help of this guide. But before that, you should know what Superfetch is!
Superfetch is an important Prefetch feature of the Windows process system since Windows XP. The main function is to catches data of apps to improve hard drive performance. It also gives a fast start to the application so it can start without taking much time. If you are facing such an issue that makes your windows system slow down in performance and you are unable to find out the real issue behind service host Superfetch, then you need to know the real face about Superfetch.
What is SuperFetch Service Host?
If you are using Windows OS since Vista, then you should know about Superfetch. It was a successor prefetch since and still performing with its underlying features in Windows 10. It analyzes the windows system, including RAM usage, and generates the application system memory catches, which runs most of the time. It helps the system to open those apps faster than other latest app. You can also say that it is the speed up process to application and control load time of those older apps runs on a hard drive. Superfetch is a backend program t which can only be seen in Task Manager, where it shows the performance of certain applications that runs on the Windows system.
Why Superfetch Using High CPU/RAM Usage?
As we know about Superfetch that it runs at the background of the window system and uses CPU/RAM system resources. So if you run any heavy application or those programs that weak hardware, then your system can get slow down, sometimes it slows the system for temporary, which recover by reboot system. It is because of the preloading apps more than RAM unused memory. It also has noticed by users that during the gaming sessions, Superfetch causes pressure to the hard drive and CPU usage. It happens only when the windows system is running on a low 4GB RAM.
How To Disable Service Host Superfetch
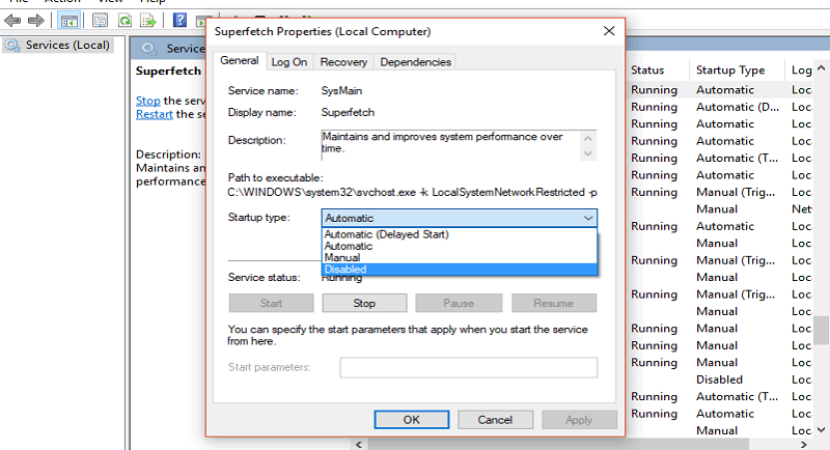
Step #1. Open the “Run” program box by pressing the “Windows + R” key from the keyboard.
Step #2. Into the provided field type “services.msc” and press the “enter” key.
Step #3. You will see that service windows pop-up on the screen; there you need to locate “Superfetch” from the given list.
Step #4. Once found, use mouse function and right-click on “Superfetch” where option appears. Click on the “Properties” option.
Step #5. In service properties, click the “Stop” button and change “Startup type” by click on the dropdown menu to select “Disabled.”
Close all program windows and restart your PC. You can check in Task Manager if Superfetch is showing and using high CPU usage then go with the next method; otherwise, you have fixed the Superfetch issue.
How To Fix SuperFetch By Disable/Enable Registry
Step #1. In this method, you have to open the “Run” program by pressing the “Windows + R” key from the keyboard.
Step #2. In the provided field type “Regedit” and then click “OK” button.
Step #3. Registry Editor pop up on screen and in this Registry window follow the location HKEY_LOCAL_MACHINE > SYSTEM > CurrentControlSet> Control > Session Manager > MemoryManagement > PrefetchParameters.
Step #4. Once you navigate following in the above step, you will get the table at the right side of Registry Editor Window, there double click on “EnableSuperfetch.” If you do not see this value, then choose “New > DWORD Value” by using mouse function right click on the “PrefetchParameters” folder.
Step #5. Enter the Values number in “EnableSuperfetch.” If you don’t know details about value number setting update, then follow the below details.
- Value “0” disables Superfetch
- Values “1” enable prefetching when the program is launched
- Value “2” enables boot Prefetching
- Value “3” allows Prefectching of everything
Step #6. Once you enter the value number, click the “OK” button and then close the Registry Editor window.
Where did Prefetch is located in the Windows System?
The location is the same in every Windows system, and it is by default, located in “C:\Windows\Prefetch.” There is no update has been released from Microsoft Windows to re-locate or change the directory of this Windows Host process.
Final Words:
Applying these methods is better than getting your system slow again and again. These methods do not delete the SuperFetch system but only disable for a temporary period. So, in any case, if you want to enable SuperFetch, then go to program shortcut:/prefetch:1 and use the special switch. We hope that this article helps you to solve the system slowdown issue. If any question, query, or suggestion wants to share with us, then use the comment box.

Reply